Showing posts with label forest. Show all posts

Wednesday, January 19, 2011

"Sharing Secrets" - wood nymph (nude) - Graphite on Film

This new work is of another wood nymph. After finishing up my last work, The Wood Nymph, I wanted to do another one but with wings this time. Staying with the wood nymph butterfly theme, I gave her wings with similar markings. The drawing was done on Dura-lar Matte film, in graphite. I did the wings in colored pencil on the back of the film. On the front, her eyes and the smaller butterfly were painted in acrylic. I also added a gold glaze on the wings for a bit of sparkle. I used the same tree and forest references as in the last work but bringing it all closer.

As with the last work, this one was done for submission to the *Unclad 2011 show. Wish me luck as I have no idea if they will be accepted or not. This is my first time ever to submit to this show. I won't know until sometime in February, I'll keep you posted. Now it's time to get busy making some fine art miniature works for all the upcoming miniature art shows and miniature categories in the summer art festivals.


Sharing Secrets © Barbara A. Freeman
Graphite and Mixed Media on Film, 6 1/2" x 9"

I was traveling with this drawing with the intention of working on it when time allowed (see below). I did make some progress, but not nearly as much as I needed to. I do know that I will take more care in packing a larger work if I travel with one in the future. In past traveling trips, I had no problem with miniatures. I sandwiched the film between foam core and it stayed protected. This one, however, was not packed as well and because it was larger, it had more area that could be smudged! I was a bit anxious about it. However, all was well and I was able to finish it and get it submitted.

I just returned last week from a trip to Florida visiting my Mom and Dad. My daughter, Gina flew in from Austin to be with us. It was wonderful to be all together again, a long overdue visit! While there Wayne, Gina and I made an overnight trip to see the Miniature Art Society of Florida's Exhibit in Dunedin, FL. We had a great time seeing the show and eating great food. The quality of the work far surpassed any I have seen in any miniature art show. I do hope I get to go again!

Thank you for taking the time to read about my work. Your comments are always appreciated. I hope you will check back soon.

*Link to the Unclad show at Gallery by the Bay in Stanwood, WA.

Work in Progress #4 "The Wood Nymph" (nude) - Graphite and Mixed Media on Film


The Wood Nymph
© Barbara A. Freeman
Graphite and Mixed Media on Film 8 1/2" x 8"

See finished work above. This is the last of my Wood Nymph, work in progress. The rest of the work is in developing the area under the tree, and the foreground.


I added two more butterflies, then added colored pencil on the underside to all three of them. They didn't seem to have the impact I was looking for so I added some acrylic paint on the front. I also added a bit of color to the figure on the underside with colored pencil and then back to the front with acrylic on the eyes. One of the things that is so much fun in using film is the ability to work both on the back and front of it and in different media.


Above is a close-up view of the wood nymph and foreground. If you look at the first image as compared to the above image, you can see where I was leaving a mysterious light source under the tree on the left side. When I get toward the end of a drawing or painting, I like to step away from it and look at it with "fresh eyes". Putting the work in a different setting, like propping it up in a different room with different lighting, or looking at photographs of it on the computer screen, all help to assess a work. Once again I found myself getting side tracked, having that light area under the tree took away the focus from the figure. I darkened all the underside and brought the attention back to the wood nymph. Her subtle color and her butterfly friends direct your eye to the figure.


This is the completed work of The Wood Nymph. I hope it will be well received. I am currently working on another "unclad" figure with the same theme of the wood nymph. I haven't done the new one as a work in progress, but as soon as it is finished, I'll be posting it here. I'm on a tight deadline and hope I am able to finish it by the deadline of January 15th.

Again, if anyone is interested, here is the link to the Unclad show at Gallery by the Bay in Stanwood, WA. Thank you for taking the time to read about my work. Your comments are always appreciated. I hope you will check back soon.

**When using film, the product is Dura-lar Matte film by Grafix.

Saturday, January 15, 2011

Work in Progress #3 "The Wood Nymph" (nude) - Graphite and Mixed Media on Film

As in my previous post WIP #2, I'll let the images show my progression on this work. One thing I forgot to mention in the last post was that I used a small brush to blend the pencil marks when making the soft shift in values on the figure. Another change is to the right of the figure where I moved the "bark" straight down rather than curving to the left.


One of the things I am really pleased with is the way the main tree developed. I needed the base of the tree to support the figure. I liked the idea of the figure half reclining as though relaxing on her throne. The model for the tree was a mass of open roots. I kept the idea of the open roots but only those under the tree.

If anyone is interested, here is the link to the Unclad show at Gallery by the Bay in Stanwood, WA. I hope you will check back soon. Thank you for taking the time to read about my work. Your comments are always appreciated.

**When using film, the product is Dura-lar Matte film by Grafix.

Saturday, January 1, 2011

Work in Progress #2 The Wood Nymph (nude) - Graphite and Mixed Media on Film

I have been in a bit of a rush lately with finishing this blog post and working on another drawing for the Unclad competition. Since many of the photos are self explanatory and you can get the idea of how I work, I'll let the progress images speak for themselves.


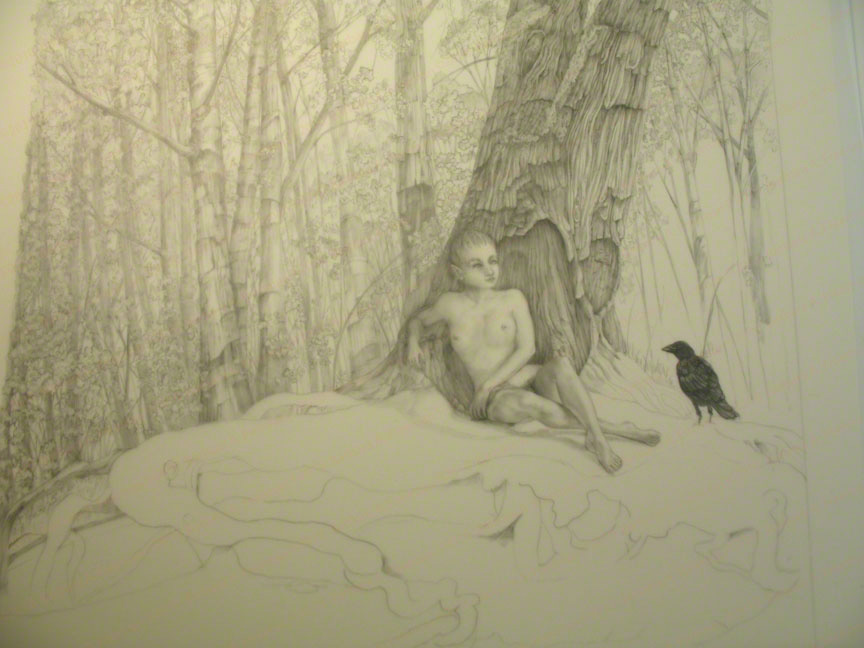
At this point I wanted to have the Wood Nymph interacting with another subject. I decided to use one of my favorites, a crow. However, I was a bit unsure of the crow, its body seemed the wrong shape. I made several attempts to correct it. I think it wanted to be a chicken! I added a wood nymph butterfly on the figure's knee.


I continued to work on the background hoping it would help the crow.


Problem solved, the crow is removed! I came to the conclusion that the crow was taking the focus away from the figure. After all, the unclad figure is the focal point and I needed to keep it that way. The crow will have to wait for another time.

If anyone is interested, here is the link to the Unclad show at Gallery by the Bay in Stanwood, WA. Thank you for taking the time to read about my work. Your comments are always appreciated. I hope you will check back soon.

Note: *One of the things that I like about film is that when using graphite on it, it is very forgiving and erases well. More care is needed when using colored pencil.

**When using film, the product is Dura-lar Matte film by Grafix.

Wednesday, December 29, 2010

"The Wood Nymph" (nude), Work in Progress - Graphite and Mixed Media on Film

This latest work is a new stretch for me. It's been quite awhile since I have done any life drawing. Normally, I don't have the human figure in any of my work, exceptions are the Buddha paintings and the Gnome with beets painting. This new work is for a local, annual, juried show I want to submit to called, Unclad. I went to see the show last year and the ideas started to brew! I knew if I did something for this competition it would have to be in a landscape and trees would have to be involved, of course. I had the perfect tree that I wanted to use. All I needed to do was find a way to get a nude figure in it as the central focus. The "unclad" figure is after all, the whole point of the exhibit.


The figures are from an artist's book of model poses that I used as a guide. I played around with different positions in my sketchbook and had several studies worked out to see which would be best suited.


I drew the outline for my tree with some guides for the forest trees and border area on larger paper. The outline of the figure I transferred to a piece of film so I could place it on the tree and move it around for the best placement. The little blobs are sticky putty to hold things in place.


When I had the composition worked out, I put a sheet of film over my drawings, then drew them in with light pencil marks. I only use a basic outline of my composition because I create the drawing as I go.


You can see where I started to create some of the trees and foliage.


The forest is further developed.


I'm still not sure at this point if this is going to work and am anxious about the figure so I started to work on the area around her head. Normally I like to work from the top left and work my way across and down. It's very easy to smudge the graphite with your arm. I always try to protect what I have done with having a barrier between my hand or arm and the work, I use a fold of soft cloth. You also want to protect the film from indentations or scratches. I had to be very careful since I was working in an area that would be in the path of my arm when I did the area above!


Here you can see further work on the forest and foliage. I've also started drawing the upper branches on the central tree. I do use my reference photo, I have it up on my computer screen. It is mostly a guide for light and shape. Much of it will be changed to form my visual idea. This is many, many hours of work and at this point, I'm happy to say, I decided that the figure appeared to be progressing in the right direction. I will continue on!

Thank you for taking the time to read about my work. I hope you will return to see the progress continued in the next post, coming soon.

**When using film, the product is Dura-lar Matte film by Grafix.

Thursday, March 25, 2010

New Work, "A Flash of Blue" - Miniature

A Flash of Blue © Barbara A. Freeman
Graphite and Mixed Media on Film 2 3/4" x 3 3/4"

At last, a new miniature work finished! The work is done in graphite on Dura-lar Matte film. I used acrylic paint and interference colors for the dragonfly and mushrooms. I also added some color on the back of the film with colored pencils giving the end of the path, a subtle, soft, warm glow. Unfortunately, it doesn't show up very well in the photo. There is a LOT of detail packed in this tiny forest!

This is the first time I've used a dragonfly in any of my images. I wanted something to suggest a bit of magic and the dragonfly and also mushrooms seemed likely images. I thought they would fit well in this landscape. I didn't know until I started my research that the Common Green Darner dragonfly is actually the Washington state insect! The dragonfly I have used here is the Blue Eyed Darner. I liked this particular dragonfly not only because of its wonderful color, but I have seen lots of these beauties once when we were on one of our walks. There was an abundance of beautiful blues zipping by and checking us out. The blue colors would vary as they darted in and out of the sunlight. It was a beautiful sight and I don't think I'd ever seen that many dragonflies at once.

The forest is inspired by Lord Hill Park. There are a lot of water spots and ponds in this park, so lots of dragonflies as well. My first walk in this park was in late February, it was very wet and cold, so we didn't walk very far. The next trip was in the spring and it was a magical experience. I must confess that I usually have magical-like experiences when I get away from the noise of people and all their stuff! When I get my work finished and submitted, I'll be heading to one of these wonderful places to experience that magic again. In the meantime, I love creating these tiny miniature escapes! I hope you enjoy looking at them.

I still need to cut mats and frame the work. They each need to be scanned and put up on my website. Those images will be a much higher quality than the photo shots I show here. When they are all up on my site, they will be complete with title, size and framed. I'll post which work I'll be submitting to each show. When they get accepted, I'll post again with more information on them. I hope if you are near any of the shows that you'll go take a look to see my miniature escapes in person. Thank you for taking the time to look at my work and read this.

Tuesday, March 23, 2010

I'm Still Here!

I know I've been absent now for awhile, but I'm still here. I'm trying to get one more miniature finished and am almost there! The new work is on Dura-lar Matte in graphite with some acrylic touches. I'm always anxious as to the outcome at this point because the drawing is all finished and now I'm adding the fun touches that bring out the magic. It's at this point where it will either be just as I'd visualized, or I could make it a total mess! The drawing is of a forest and I'm really pleased with how it turned out. The magic is in the tiny bits I'm doing right now. I hope to have it ready to show in the next day or so. I will show it regardless of the outcome. I think it's important to show the blunders along with the successes. I'm keeping my fingers crossed for the success on this one! Now back to work!

Tuesday, October 27, 2009

Final Phase, Bringing it all Together!

Work in Progress, Acrylic on Gessobord, 4" x 4"

#12

I worked on darkening the edge of the large rock, adding the holes, giving them depth. I also needed to pay attention to the rocks on the right side, give them some detail without making them too important. I added shadow areas throughout the holes and rocks.


#13

I further refined the dark forest, adding tree trunks and branches, touching up the sky holes, bringing some trees forward, moving some back. I also added some cliffs on the far right side. Here is a closer view of the rocks in the foreground.


#14

More branches were added here as well as some leaves. I also worked the roots on the upper rock on the right.


#15

The front edge of the large rock has been further defined with the under shadowing and carried over where it meets with the other rocks. I like the shape and curve of this opening. All the details have been added and it's just a matter of looking to see what else needs a bit of tweaking.


#16

In one of my photos of the area, I noticed a seagull. I really didn't see it at first, except when I was trying to see some other detail under magnification, there it was. I thought it would be a great addition. However, the seagull was not easy to paint! At first I just couldn't get it to look real, I did not want the cliché of a "bird". I realized my difficulty was the surface, it wasn't smooth, there was too much drag on the brush. So after letting the area dry, I added a thin layer of soft gel medium diluted with water, like an isolation coat, and let it sit overnight. The next day I was able to work the bird much easier, the brush moved freely on the surface. I was able to create the shape of a bird with some light and dark areas suggesting the body and wings. Whew! it was so tiny to paint! All I have to do now, is put the isolation coat on, and then after it dries, varnish and frame it. Oh, and yes, the fun part...a title!


#17

Above is the final work in the frame I have chosen to put it in. I am pleased with the outcome. I really like the way the seagull breaks up the darkness of the forest and pulls the eye through the work. What struck me was the serenity of this place. There were so many ways for the senses to be stimulated, the feel and look of the different textures of the rocks, the contrast of the dark forest and the overcast sky. Not seen in this painting, but can be imagined, is the water of the sound on the left, the sand and pebbles and tidal pools below. It was chilly, but the air was fresh. I can't wait to go back!!

I'll be posting the final image on my website and here as well when it gets scanned and I give it a title! This work was done for the Miniature Masterpieces and More exhibit coming up at Kaewyn Gallery's holiday show. I'll be talking about that in the near future, so stay in touch.

Thanks for looking and reading about my process. I have done this for myself as well as anyone else who is interested. I think it will be good to have as a history, not only of how I worked at this point in time, but what I thought about it. I do want to make it clear that this wasn't posted in real time. I took a photo every day before I started working. Then I took the best photos in their order and posted the work a few at a time. I take a long time on each work, too long! If I posted them in real time, it would take forever between posts. Therefore I chose to do it this way. I wish I were faster, but I'm not and that's the way it is. Besides, it's the journey that's important! Now, next, graphite on film.