Thursday, January 28, 2010

"Peek-a-Boo", New Miniature in Acrylic

Peek-a-Boo, © Barbara A. Freeman
Acrylic on Claybord, 3 5/8" x 3 5/8"

My latest miniature work is a redo from one that I had done in colored pencil on film several months ago. I ran into problems with the first one though, and had to abandon it, (see below). I knew I wanted to come back to doing the chickens because I liked their expressions, they were so cute. I especially liked the way the one is partially in the picture plane. It was as though it wanted to be sure to be in the picture too. They were really funny to walk through and photograph. They were difficult to shoot, would not pose and instead, would come up to the camera and try to peck it. This chicken breed is the White Cochin Bantam.

This was my first animal painting in acrylic. I have always used either graphite or colored pencil to do any animals because I liked the control in getting all the small details. Now, though, after painting these, I would not hesitate to do more. It was a bit challenging getting all the value shifts in the whites though. Such fun! It still needs to be varnished. I'll post it again when I have it framed.

Radioactive Chickens, Colored Pencil on Film, (left),
"Peek-A-Boo", Acrylic on Claybord, (right)
© Barbara A. Freeman

Above are the two works side by side. The colored pencil work was finished except for the final fixative. However, after spraying it, the piece was ruined, my chickens ended up looking radioactive!!! I think it was because I sprayed the fixative too heavily, which caused the colors to run. A very bright yellow ran on the backs of the chickens and the blues surrounding them is neon blue! Needless to say, I was upset. So, I put the chickens aside and concentrated on other subject matter using a different medium. Even though it was disappointing having my work ruined after finishing it, the experience did end on a positive note by getting me to push myself into painting the chickens. I was very pleased with the results and think it is a better work overall.

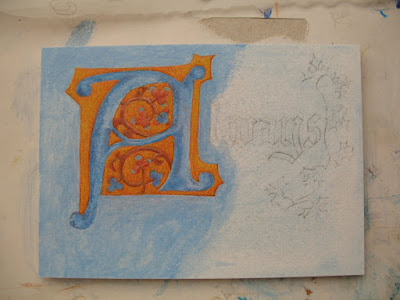
Next, I am back to finishing up Always Illuminated, the illuminated word I've posted about earlier. I'm doing it in acrylic and expanding the work, making it more than just the word. I hope it works out! Until then, thanks for taking the time to read this and look at my work.

Wednesday, January 20, 2010

New Miniature in the Italian Landscape Series, "Over and Beyond"

My latest miniature painting is another in my Italian Landscape Series. I had started this one a while back, but didn't like the colors in the sky, nor the way the light was hitting the tops of the mountains. I put it away and moved on to another work. I find it's good to do that, when a piece just doesn't grab you but you have put so much work into it. This one had been at that point. Meanwhile, I was thinking about what I wanted to do next, when I saw it sitting there on the miniature easel where I prop them to "age". I picked it up and just started working on it. I think it's good sometimes to put all the photos and references away and let your painter's eye take over. Once I got the sky area worked out, the rest was the fun part of just refining the details. I'm very happy with it now. It still needs the isolation coat and varnish. When that has all been done and a frame chosen, I'll post it again. Thanks for looking and taking the time to read this.

Over and Beyond, © Barbara A. Freeman
Acrylic on Claybord, 3 5/8" x 3 5/8"


Thursday, January 14, 2010

Miniature Art Society of Florida Show Opens and Other News

This weekend the 35th Annual International Miniature Art Show opened. I have five miniature works in this show, (you can see them in this blog post). I heard that sales were doing really well at last night's Collectors Preview and Artists' Reception. I hope several of them were mine! The show opens to the public today at 1PM to 5Pm. The show runs from January 17th through February 7th, 2010 at the Leepa-Rattner Museum of Art, 600 Klosterman Road, Tarpon Springs, FL. This is the largest miniature art show in the country and one I would love to attend. There are 850 works of art from 221 artists, in addition to the society’s permanent collection of more than 100 miniatures. There are magnifying glasses available for the complete enjoyment of these small treasures. Entries are from 33 states and 11 countries!

Other news...the prospectus is now online for Parklane Gallery's 18th Annual Miniature Art Show, in Kirkland, WA, at www.parklanegallery.com.

Also, another great miniature art show coming up is at Seaside Art Gallery in Nags Head, NC. You can find their prospectus for the 19th International Miniature Art Show on their website, at www.seasideart.com. I am planning to have work in both of these shows and will be blogging about them in the near future.

I have a new painting to share soon and another one in process. I'm sorry I've not been able to share much due to my trackball (mouse) causing me problems. I am using a loaner until my new one arrives on Tuesday. This one is different and like my new one, so I'm having to retrain my thumb! Now back to painting!

Thursday, January 7, 2010

Kaewyn Gallery Miniature Exhibit Extended

I just got an email from Kaewyn Gallery that the Miniature Masterpieces and More exhibit will be extended through January 29th. If you didn't get a chance to see the show, there is still time! I have three miniatures remaining in this exhibit, Innocence, "Rhodie" With Bee, The Sentinel, and one small work, A Meditation on the Pacific Northwest , (located up front by the window). So if you don't know what to do with that check from Santa, consider some local art at Kaewyn Gallery, 10101 Main Street in downtown Bothell, WA. Support your local artist!

Tuesday, January 5, 2010

First Attempt at Egg Tempera

First, let me say, Happy New Year !! 2010!! It's hard to believe we're already in the first week of a new year. Where does the time go?

Now on to new work! After I finished the stone with the illuminated G, I needed something that I could paint in miniature using egg tempera. I wanted to keep it simple so I decided to do another illuminated letter. I didn't have as much of a problem as I thought I would with cleaning the egg yolk for the medium, (thank you Mona for your demo)! I found that using my hands to clean off the yolk worked better for me than the paper towel though. Until I know better what I'm doing, I am using watercolor instead of powdered pigments, except for titanium white. My surface was a 100% rag illustration board. My friend Janie Olsen ordered some of the True Gesso panels and is bringing me one on Friday. The True Gesso panels are not made with acrylic gesso, but made with the rabbit skin glue formula and are perfect for egg tempera painting.

Below is what I did and the problems I ran into. I think the hardest part was knowing when I had enough medium mixed with the paint. Also, I noticed the paint that was already applied was fragile and could scratch easily. I used thin paint to seal the surface and then on top of that I would use cross hatching and thin glazes. Sometimes the paint would lift off if it wasn't completely dry so I would work on another area.

You can see the cross hatching on the gold/orange area.


Here is where I've covered all the surface with thin layers.

I have continued to build up color and light. Here is where I started noticing problems. There is a flaky place just above the "a" and "y". Then the same thing started happening on the lower left corner. I was going to repair it on the bottom left corner by building it back up, but thought I'd leave it for awhile and see if anyone has any solutions. I also wonder about just using some of the medium alone on top of the flaky place above the "a" and "y" to see if it would stabilize it.

I continued to work on it because I was hoping to save it. I loved the glow and the colors. You can see the flaking places really well here as I used my brush to lift them off hoping I could repair them. I started to repaint, but gave up because I wasn't sure if I would run into this elsewhere as well. At this point I had already spent too much time without any assistance. I would like to know if I am on the right track, if this flaking is because I've not used enough egg medium, or if it's because I added too much paint or too many layers without it being dry? From the research I did, it sounds like the answer could be YES to all of them. But I don't know which and I'd like to avoid it again!! I'm having Janie look at it when she comes over. She's done some egg tempera and took one of Koo Schadler's one day workshops. I'm hoping she can at least give me her opinion. Any other suggestions would be welcome. I know Mona Diane Conner does beautiful work in egg tempera and sometimes visits here, so maybe she can give me some insight. I will try again. However for now, I need to move along and get some work finished for all my miniature deadlines coming up!

This is the new attempt so far of the same image using acrylics. I'll post the finished work when it's done. I enjoyed using the egg tempera so far and I'll be going back to it when I get a slot of time to try again. I think it's probably like anything else that you do. You have to do it a lot till you work out the problems and get better at it. So for now, I'll put the egg tempera on pause. Thanks for reading this post.